I also found another interesting object with great potential. This piece is probably more in tune with the not so perfect or beautiful. The cactus plant abounds here, taking some time to be destroyed by the cochineal bug. When you see the sick and dying plants, you notice the fibrous tissue that makes up the inside of the plant. I picked up this small piece and photographed it because it seemed a great source of inspiration for some machine lace stitching on water soluble fabric. I can't wait to hopefully stitch something as interesting and delicate as nature has produced!!!
Monday, August 2, 2010
Nature's Inspiration
I can't help but marvel at the unusual and interesting forms we see in nature. As each of us strive to make that perfect bullion rose, or evenly stitched leaf or tree trunk, I wonder why. Sometimes beauty in nature is not always because of perfection, and sometimes it's there when you least expect it. I have this photograph to share showing 'beauty'. I had never really LOOKED at this rose much. It blooms well, has no perfume, and I don't know it's name, but a few days ago I was searching for something to 'snap', which gave the opportunity to LOOK at it more closely. The morning was quite foggy which always yields something interesting. On close inspection I could see that the centre of this lovely rose seemed to have the petals forming a spiral. Thinking this might be something interesting to work with on my photo altering gig, I zoomed in on the rose, and then zoomed in again. The very fine droplets of moisture took on a life of their own in the zoom mode, reminiscent of pictures I've seen where violets have been brushed with egg white and sprinkled with castor sugar. Perhaps you may see something different in them.

I also found another interesting object with great potential. This piece is probably more in tune with the not so perfect or beautiful. The cactus plant abounds here, taking some time to be destroyed by the cochineal bug. When you see the sick and dying plants, you notice the fibrous tissue that makes up the inside of the plant. I picked up this small piece and photographed it because it seemed a great source of inspiration for some machine lace stitching on water soluble fabric. I can't wait to hopefully stitch something as interesting and delicate as nature has produced!!!

I also found another interesting object with great potential. This piece is probably more in tune with the not so perfect or beautiful. The cactus plant abounds here, taking some time to be destroyed by the cochineal bug. When you see the sick and dying plants, you notice the fibrous tissue that makes up the inside of the plant. I picked up this small piece and photographed it because it seemed a great source of inspiration for some machine lace stitching on water soluble fabric. I can't wait to hopefully stitch something as interesting and delicate as nature has produced!!!
Friday, July 30, 2010
Bragging Rights
Last month I made a journal cover which I entered into the monthly challenge on the FAMM site. The theme was 'the sun'. I did give a more detailed account of the project in an earlier post - details here
I have the great honour of announcing now that my entry was chosen as the most creative, and today my little prize package arrived. To say I am overwhelmed is an understatement, as many talented ladies share their work.
You can see the site announcement here
The challenge for July is Stars and Stripes, but unfortunately, time has beaten me this month, and I won't have an entry. I most certainly hope I can contribute again in the coming months.
I have the great honour of announcing now that my entry was chosen as the most creative, and today my little prize package arrived. To say I am overwhelmed is an understatement, as many talented ladies share their work.
You can see the site announcement here
The challenge for July is Stars and Stripes, but unfortunately, time has beaten me this month, and I won't have an entry. I most certainly hope I can contribute again in the coming months.
Thursday, July 29, 2010
Paper Play Day
For some time now I've been reading about the ability to use brown paper in one's textile/mixed media adventures. I haven't actually tried using it in anything involving textiles to date, but after playing with this great project, I'm up for a bit more with this.
Last week I downloaded an 'instant lesson' via Sue Blueweiss' site. The project involved using old brown paper bags that had been used for store purchases. You can see more information about the lesson here
Of course, my first effort is nothing as professional as the finish Sue accomplishes, but I'm thrilled to bits with what I've made. I did only use what I had in the house, hence the colour scheme. Somewhere at a weak moment I must have purchased a packet of pale blue rose metallic A4 card stock, so it was as good a start to the project I could find, plus I had some Sapphire Treasure Gold that I thought might make an excellent highlight to the roughed up surface of the paper.
I managed to find a suitable 'blue rose' image using Clip Art, so I could decorate each section of the book. I can't recommend this lesson highly enough. The purchase and download was over in an instant, and I was ready to get to work with something new and exciting. I now have my very own journal ready to record my thoughts on future projects. I will most certainly be exploring this further, using different colours/papers etc.
Last week I downloaded an 'instant lesson' via Sue Blueweiss' site. The project involved using old brown paper bags that had been used for store purchases. You can see more information about the lesson here
Of course, my first effort is nothing as professional as the finish Sue accomplishes, but I'm thrilled to bits with what I've made. I did only use what I had in the house, hence the colour scheme. Somewhere at a weak moment I must have purchased a packet of pale blue rose metallic A4 card stock, so it was as good a start to the project I could find, plus I had some Sapphire Treasure Gold that I thought might make an excellent highlight to the roughed up surface of the paper.
I managed to find a suitable 'blue rose' image using Clip Art, so I could decorate each section of the book. I can't recommend this lesson highly enough. The purchase and download was over in an instant, and I was ready to get to work with something new and exciting. I now have my very own journal ready to record my thoughts on future projects. I will most certainly be exploring this further, using different colours/papers etc.
Monday, July 26, 2010
Pleasant Dreams
This post has really nothing to do with stitching, but I wanted to share this cute photo. Well, I suppose there is a stitching story. The bedding is my very first piece of patchwork..........end of stitching story.
This is one of our dogs [at last count there were eight]. He celebrated his 13th birthday this month, and has been a hard and faithful worker for my husband. Thankfully, now he is retired, and spending some quality time dreaming about the last round-up.
Hope this makes some people smile for the day. The quality of the photo isn't excellent. I had to take it through the glass in the back door, zooming in quite a bit [didn't want to wake him].
This is one of our dogs [at last count there were eight]. He celebrated his 13th birthday this month, and has been a hard and faithful worker for my husband. Thankfully, now he is retired, and spending some quality time dreaming about the last round-up.
Hope this makes some people smile for the day. The quality of the photo isn't excellent. I had to take it through the glass in the back door, zooming in quite a bit [didn't want to wake him].
Saturday, July 24, 2010
A 'Nice' Reminder
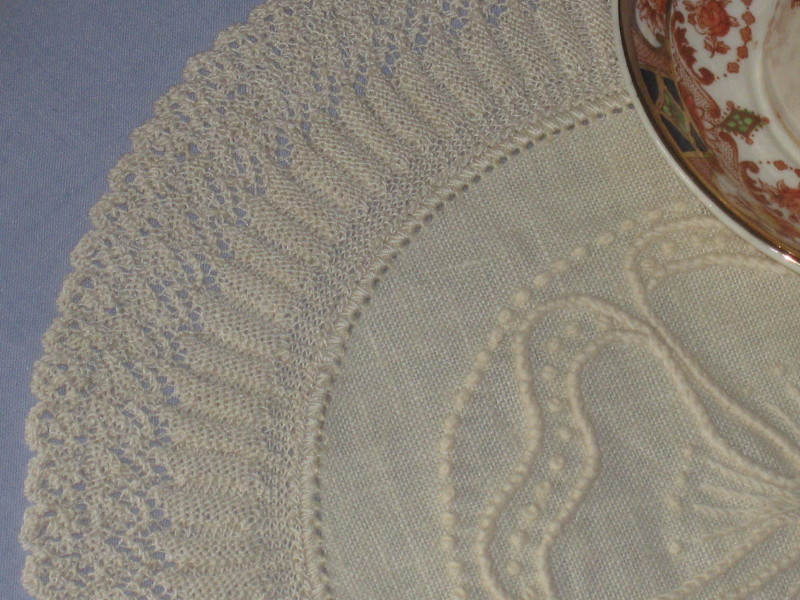
Two years ago today I made an unfortunate error with my footing, fell, and broke my right [good] arm, very close to the shoulder. It was the first time in my life I had ever broken a bone. My friends know all about it, so I hope I won't bore them to death AGAIN. It was impossible to set it in a cast, so I was sent home from the hospital with the arm in a sling, plus a packet of painkillers. I often wonder what might have happened had I needed a pin inserted. I had visions of me with a bottle of whisky and bone to bite on prior to surgery, a la John Wayne!!! Ah well, it was a time to sit and plan I suppose. The reason I'm offering this information is simply to share something I did during that time. I was unable to stitch for a long time, as I had obviously done much more damage to my shoulder and shoulder blades than anyone had thought.
This was my first piece of very fine lace knitting [#40 crochet thread]. I could knit and crochet, as both use forearm movements, which I could manage, about at the three week mark. I knitted, and knitted and knitted some more. By the time I had enough knitted to make a good sized edge, I could also embroider, etc. I had the linen, thankfully the exact colour as the crochet cotton.........it pays to be boring sometimes. I also had some candlewicking thread.
I did the hemstitched holes myself using my Bernina machine and a wing needle, then worked a row of double crochet into the holes so that I had a good foundation on which to stitch the lace. This is one of my favourite pieces, and knitted lace one technique I just never do enough of.
Although this was a trying time, I'll always have this lovely mat to remind that there is always something positive to take out of every situation.
This was my first piece of very fine lace knitting [#40 crochet thread]. I could knit and crochet, as both use forearm movements, which I could manage, about at the three week mark. I knitted, and knitted and knitted some more. By the time I had enough knitted to make a good sized edge, I could also embroider, etc. I had the linen, thankfully the exact colour as the crochet cotton.........it pays to be boring sometimes. I also had some candlewicking thread.
I did the hemstitched holes myself using my Bernina machine and a wing needle, then worked a row of double crochet into the holes so that I had a good foundation on which to stitch the lace. This is one of my favourite pieces, and knitted lace one technique I just never do enough of.
Although this was a trying time, I'll always have this lovely mat to remind that there is always something positive to take out of every situation.
Wednesday, July 21, 2010
Revisiting the Weaving Issue
In an earlier post I shared some wavy weaving with everyone. Some people have since asked how it is done. I have tried to find some reference and instructions via Google, but have come up empty handed. I feel a little reluctant to say too much here as this is not my idea, but I will share a little of my play with you. When this was first brought to my attention [via a patchwork friend], the method explained was pretty sketchy. I was told to take two fat quarters, place them together and make wavy cuts in them, both identical of course [and to make this easier one could purchase a special wavy ruler!!]. Then take each one and place them side by side, giving one a quarter turn. I actually didn't want to make a big item [the other ladies were making a cushion top]. I wanted to use the technique in a much smaller way. I used two nine inch square pieces of fabric, and cut lots of wavy lines in each. I was afraid to deviate from the 'instructions' for fear of retribution by some far away weaving police.
However, yesterday, I decided to take two pieces of paper, both identical in size, but both rectangles. I cut one into wavy pieces on the short side, the other on the long side, just cutting where I felt like it. I can now tell you, this works, ie any wavy lengths seem to weave into one another, so if you feel like being a bit rebellious, get out your paper and have a go before you move onto vliesofixed fabric...............
As you can see here, I have quite an attractive piece of wavy woven paper.
Since playing with this technique, I've been reminded of something else I saw in a magazine some years ago, but to date have not tried. If any of you buy a magazine/booklet called Magic Patch, you may have issue #19. There is an article and instructions in this magazine for a technique called Mesh Work [Japanese]. It's essentially to promote Clover products, but I am leaning towards trying this technique using vliesofixed fabric strips. I have seen a book available for purchase, so will include this link for The Craft Mailbox.
I hope some of this has been helpful, and please don't be afraid to play. I'm off to do some embroidery, and next week I must try this Mesh Work, it looks like having possibilities.......
However, yesterday, I decided to take two pieces of paper, both identical in size, but both rectangles. I cut one into wavy pieces on the short side, the other on the long side, just cutting where I felt like it. I can now tell you, this works, ie any wavy lengths seem to weave into one another, so if you feel like being a bit rebellious, get out your paper and have a go before you move onto vliesofixed fabric...............
As you can see here, I have quite an attractive piece of wavy woven paper.
Since playing with this technique, I've been reminded of something else I saw in a magazine some years ago, but to date have not tried. If any of you buy a magazine/booklet called Magic Patch, you may have issue #19. There is an article and instructions in this magazine for a technique called Mesh Work [Japanese]. It's essentially to promote Clover products, but I am leaning towards trying this technique using vliesofixed fabric strips. I have seen a book available for purchase, so will include this link for The Craft Mailbox.
I hope some of this has been helpful, and please don't be afraid to play. I'm off to do some embroidery, and next week I must try this Mesh Work, it looks like having possibilities.......
Monday, July 19, 2010
Scrap Quilt
I had to wash one of my quilts on the weekend, so decided I might share it with some of the ladies who visit my blog.
This scrap quilt was adapted from a pattern I saw in an American Quilting Magazine [dating back to pre-2000]. I love scrap quilts, and really should make another. The biggest drawback is that machine quilting for me is becoming too hard, and I refuse to have them quilted by someone else. The original design had the blank areas quilted, but I had not long purchased a sewing machine with the embroidery unit, so decided to give it a really good try. I had to hoop this up 247 times!!!! It may have been easier to embroider the fabric prior to assembly, but to be honest, I didn't think about it until I was actually confronted with all of those blank squares.
Each of the machine embroidered motifs has been stitched with randomly coloured rayon threads for the flowers, and the same green throughout for the leaves/stems. It is one of the prettiest quilts I've made, and I don't think I'd change a thing if I were to do it again. The floral fabric used for the outer border is also the backing fabric. This design is so simple, and it's just the off-set placement of each square that forms this zig-zag effect.
This scrap quilt was adapted from a pattern I saw in an American Quilting Magazine [dating back to pre-2000]. I love scrap quilts, and really should make another. The biggest drawback is that machine quilting for me is becoming too hard, and I refuse to have them quilted by someone else. The original design had the blank areas quilted, but I had not long purchased a sewing machine with the embroidery unit, so decided to give it a really good try. I had to hoop this up 247 times!!!! It may have been easier to embroider the fabric prior to assembly, but to be honest, I didn't think about it until I was actually confronted with all of those blank squares.
Each of the machine embroidered motifs has been stitched with randomly coloured rayon threads for the flowers, and the same green throughout for the leaves/stems. It is one of the prettiest quilts I've made, and I don't think I'd change a thing if I were to do it again. The floral fabric used for the outer border is also the backing fabric. This design is so simple, and it's just the off-set placement of each square that forms this zig-zag effect.
Subscribe to:
Posts (Atom)