I've finally finished my needlecase challenge for 2010. This month I decided to try another counted thread stitching technique that was relatively new to me. I have seen some references to this type of work, ie Hapsburg Lace stitching, but very few patterns. There are kits available on Tanja Berlin's Website, more of the 'sampler' kind, and on canvas. I set this design out in a quad ruled pad, roughly, and began stitching from the top right hand corner. I've used Lugana 25ct, and stitched with Finca Perlé #16. I hope this photograph gives you an indication of the overall pattern. The fabric I've used for the background is my inner lining, with hot pink wool felt for the needle pages.
There are only a few simple stitches for this technique - Smyrna stitch, round eyelet stitch, and a mosaic filling [which is essentially a double running stitch, slanted].
The raw edges have been turned under, corners mitred and finally I've stitched Antwerp edging stitch to finish the needlecase. The lining has been inserted in exactly the same way as November. I really like this technique, and feel I would do more in the future. Thank you again to everyone who has followed the progress of this challenge, and made the time to comment. I have not had a moment to catch up on my usual blogs, so please bear with me my friends. Cheers.
When I first challenged myself to complete a needlecase each month for the whole year, I began searching my stitch dictionaries in order to determine a starting point for each of said projects. From very early in my search, I decided I'd love to try Norwich stitch for November. You can see how it is worked on this site: http://www.artsanddesigns.com/cgi-bin/makeGlossary.pl?category=embroidery§ion=N It seemed traditionally a canvas stitch, but I don't really have the time at the moment to stitch enough to cover the whole background area of a needlecase in canvas, so I decided I'd use the stitch on evenweave fabric, trying a linear design. I settled on this interlocking squares design, using Lugana fabric which I had in my cupboard. The colour choice was simple - what threads did I have, did I have a suitable lining fabric in my stash, and was there a matching piece of wool felt hidden somewhere here..................... As you can see, I managed to scrape together something suitable. I have stated many times how I like yellow. Well, it has to be a strong golden yellow, something akin to what I term pumpkin.
After I'd finished the interlocking squares, I marked the perimeter with some running stitches and finished the edges with plaited buttonhole stitch. I don't seem to be able to find a suitable link with a simple drawing, so hopefully my photo and explanation will be of some help. It is worked by making the stitch as one would a satin stitch [first movement], and follow up by taking the needle under that stitch and catch the working thread as you would in a normal buttonhole stitch, pull and neaten before moving on. It makes a firm, decorative edge.


 I hope this closeup of the Norwich stitching will allow everyone to see it's wonderful texture. It looks complicated, but once you have your mind set on it's method, there is nothing to it. I'm really pleased to have November's needlecase finished so early in the month, as I am hoping to make some Christmas decorations.
I'm getting there!! I knew sooner or later the patchworker in me would appear, so this time around I used a little of that experience to settle on a theme for October. This one has been made using an origami technique, and fabrics printed with an oriental theme.
The design for the centre was taken from a little booklet purchased from Chandler's Cottage. You can see lots of beautiful quilts, etc. and fabrics on their website:
http://www.chandlerscottage.com/
This centre piece was originally 10 inches square. I am having great success with the finishing of these needlecases using pelmet vilene for the stiffening on most projects. This stiffener makes the whole needlecase nice and firm.
This is the inside of the needlecase. This fabric was purchased almost ten years ago, along with several others in that 'story theme'. I have mountains of plain purple and I really don't know why, as purple has never been one of my favourite colours. However, it works well with this fabric, and I also had the purple wool felt, so the colour was set in concrete, so to speak.
I am thrilled to share my August needlecase [and August is still not quite finished]. Another 'A' word had me puzzled until one day whilst browsing StitchinFingers, I noticed a beautifully worked bookmark stitched by one of the members who I am now pleased to call my friend. Cindy Brown showed us a piece worked in Aztec Stitch which I had never seen. You can see some of Cindy's work on her blog here After a little Google search, I was fortunate to find a PDF download with suitable instructions.
Basically, you are working on a withdrawn grid. Again, the only 'new' purchase for this project was the wool felt. Somehow, in all of my stash, I found just the right shade of evenweave to match the shading in the multi-dyed fabric, and I knew I remembered buying some lovely NeedleWorX overdyed threads at some stage. It just took me a little time to find where it was hiding.
I hope these photos do the lining fabric and the stitching justice. This project really didn't take me long to complete. I am extremely happy with it and would most definitely use this Aztec Stitch again, as I found the wrapping/carrying quite relaxing.
 I must thank Cindy for sharing her work and bringing this to my attention, and I really have to think about making some sort of start on September's effort................
............and rethinking the square red button!!!
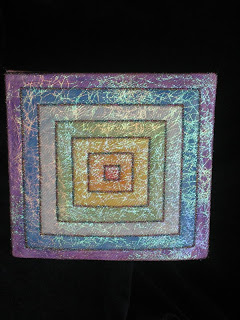
 Well, it's done, and I'm so totally happy with this piece of experimentation. When the girls over on 3CS asked us to try water colour crayons, etc., I decided that I'd finally found a way to use a beautiful piece of wool felt that a friend had sent me about two years ago. It's one of the lovely dyed pieces you can buy from Colourstreams here in Australia [www.colourstreams.com.au].
When I started working on this, all I could think of was a rainbow. So, I began colouring each section as if it was a 'square' rainbow. I wanted the corners to having flowing lines, because the dyeing on the felt was 'flowing'. It seemed to need 'something' so I found out some crystal shred/angelina fibre look-alike, which I spread sparsely over the surface of the painted area, then covered it with fine black tulle. After ironing, it just took on a life of it's own. It's hard to see how beautifully sparkly/blingey it is with the camera. The black stitching seemed the way to go, as black always brings out colour.
Well, it's done, and I'm so totally happy with this piece of experimentation. When the girls over on 3CS asked us to try water colour crayons, etc., I decided that I'd finally found a way to use a beautiful piece of wool felt that a friend had sent me about two years ago. It's one of the lovely dyed pieces you can buy from Colourstreams here in Australia [www.colourstreams.com.au].
When I started working on this, all I could think of was a rainbow. So, I began colouring each section as if it was a 'square' rainbow. I wanted the corners to having flowing lines, because the dyeing on the felt was 'flowing'. It seemed to need 'something' so I found out some crystal shred/angelina fibre look-alike, which I spread sparsely over the surface of the painted area, then covered it with fine black tulle. After ironing, it just took on a life of it's own. It's hard to see how beautifully sparkly/blingey it is with the camera. The black stitching seemed the way to go, as black always brings out colour.
 When I thought about the 'inside', I thought I'd need to anchor the felt with a big button, and therefore the stitching might show through to the outside, hence the need for the square red button [to hide said stitches]. However, I decided it was more prudent to fuse the black lining to the stitched outer, and just machine stitch the felt to the lining prior to fusing. Then I only needed to cover that stitching with a button, so no need to stitch through to the outside. I managed to buy a square red button, but it has become part of the stash now, and waiting for the next time................
Enjoy..............
When I thought about the 'inside', I thought I'd need to anchor the felt with a big button, and therefore the stitching might show through to the outside, hence the need for the square red button [to hide said stitches]. However, I decided it was more prudent to fuse the black lining to the stitched outer, and just machine stitch the felt to the lining prior to fusing. Then I only needed to cover that stitching with a button, so no need to stitch through to the outside. I managed to buy a square red button, but it has become part of the stash now, and waiting for the next time................
Enjoy..............


 I hope this closeup of the Norwich stitching will allow everyone to see it's wonderful texture. It looks complicated, but once you have your mind set on it's method, there is nothing to it. I'm really pleased to have November's needlecase finished so early in the month, as I am hoping to make some Christmas decorations.


 When I thought about the 'inside', I thought I'd need to anchor the felt with a big button, and therefore the stitching might show through to the outside, hence the need for the square red button [to hide said stitches]. However, I decided it was more prudent to fuse the black lining to the stitched outer, and just machine stitch the felt to the lining prior to fusing. Then I only needed to cover that stitching with a button, so no need to stitch through to the outside. I managed to buy a square red button, but it has become part of the stash now, and waiting for the next time................